
Why Rotisserie Beats a Static Grate for Big Cuts
Rotisserie is how you cook a large roast or whole bird slowly and evenly. The spit turns constantly, so fat and juices self-baste the meat instead of dripping straight into the fire. The result is a crisp exterior and an exceptionally moist interior — the method professional chefs still prefer when the cut is big enough to earn the setup.
Plan on 1½ to 4½ hours, depending on size and type of meat. You can run rotisserie two ways on a Ruby: indirect heat from the main burners, or the rear infrared burner for high-heat searing. The intense IR is ideal for locking in juices and nutrients on quality meat.
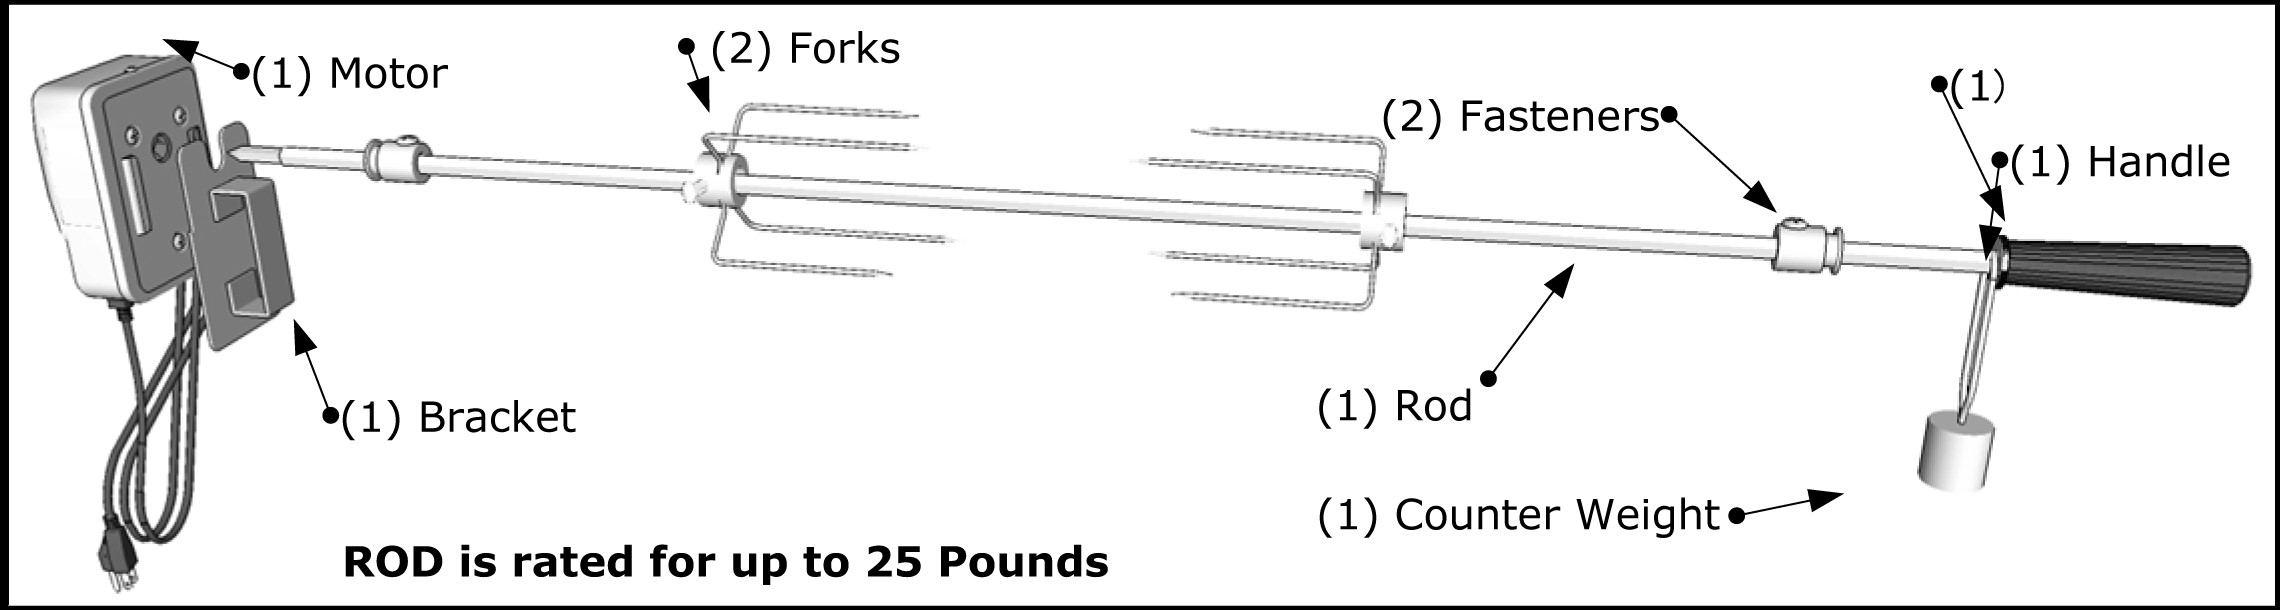
Success starts with balance. Center the meat on the spit rod as evenly as possible so the motor is not fighting a lopsided load. The rod is rated for up to 25 pounds.
High and Low Spit Positions
Your Ruby grill has high and low spit-rod positions:
- Low position — centers the meat in the firebox for even, indirect roasting.
- High position — brings the meat closer to the rear infrared burner for high-heat searing.
You can also run two rotisserie rods and motors criss-crossed when the cook calls for it. Insert the motor into the motor bracket assembly first, then build the spit.
Assemble the Spit
- Slide the prong forks onto the spit rod with the prongs facing away from the handle, so the food sits centered between the two four-prong forks.
- Assemble the key washer, counter-balance, and handle onto the spit rod. Slide the shaft collar on with the long end toward the handle.
- Plug the motor extension cord into an adjacent grounded GFCI receptacle.
- Before food goes on, set a pan on the grilling grids beneath the spit to catch drippings. That keeps the grids from loading up with fat and makes cleanup easier. Once the meat is on the rod, tighten every bolt securely.
Load, Balance, and Cook
- Preheat with all burners on high. When the grill is hot, turn off all but the rear burner for infrared rotisserie — or, for indirect heat, preheat then turn the remaining burners to low. The spit should hang over the front or center so the meat is not sitting directly over the flame. Place a drip pan on the grill below the meat and add about ½ inch of water.
- Slide the first pair of prongs onto the spit, push the meat onto the rod and into those prongs, then add the second set and press them in so the roast is locked on. Tighten the wing nuts. Set the spit into the brackets on both sides of the grill.
- Adjust the counter-balance weight as needed. Start the motor and watch a full rotation: the meat must turn evenly with no wobble. Shift the grate or drip pan if the cut is large. Nothing should catch as it turns.
- Close the lid and let the rotisserie work. Rotation melts fat and bastes the meat on its own; mop with sauce only if you want extra flavor. Probe with a meat thermometer before you shut the heat off. When it is done, pull the spit with insulated oven mitts, set the meat on a clean platter, and tent with foil to rest.
Rotisserie Checklist
- Meat centered and balanced on the spit — never over 25 pounds
- All fork bolts and fasteners tight before you start the motor
- Drip pan under the food, about ½ inch of water in the pan
- Low spit for even roast, high spit to work the rear IR burner
- Motor plugged into a grounded GFCI outlet
- Lid closed; thermometer for doneness; rest under foil
Shop the Grill That Was Built for This
Ruby Pro-Sear grills carry the high/low spit positions and the rear infrared burner this method is written around. See the Ruby™ Pro-Sear Gas Grills collection, starting with the 30" 3-Burner. For heat-up and searing technique, read 800°F sear and flame tuning.